Road King
Bringing a 1948 cruiser bicycle into the 21st century.
Let's start this story in the middle of the 20th century, when consumer confidence was high, unions were strong, and American factories were working overtime to satisfy consumer demand and new-found discretionary spending.
Against that backdrop a strange sort of amalgamation of hardware/auto parts/durable goods store was common in even the smallest towns in America. Western Auto and Firestone may have been best known, for these types of stores, but they were far from the only ones.
At the time, the Sieberling Rubber Company was one of the biggest tire companies in the US, and just like Firestone and other tire makers, they ran a chain of these odd retail stores, selling their tires, car batteries and other various things... including bicycles, which they sold under their "Road King" brand.
And since Sieberling wasn't in the business of making bicycles, they contracted that work out to several different companies that once dominated US bicycle manufacturing.
So that's how the now largely forgotten Monark Silver King bicycle company of Chicago found itself contracted to build this bike:

Which found its way to me recently.
Monark ceased to exist after 1957, following a buy-out by Huffman/Huffy. Sieberling Rubber made it to the mid-60s before being gobbled up by Firestone, and then later becoming part of the multinational Bridgestone corporation.
I started out buying a classic cruiser, I got a lesson in America's 20th century manufacturing boom and bust. The bicycle is going to get a lesson in how bicycle technology has progressed over the past 75 years.
But, about that bike: I had been wanting to build a classic "Klunker" for awhile. When this one turned up on the local marketplace, I liked the details of the frame, so I threw out a low offer and was surprised when it was accepted. Next thing I knew I was driving a half-hour out of town to pick it up. Once I got it home I took some pics to document the "before" state...


I pretty much immediately began stripping it down, and was really pleased with how easy that went. I was prepared for every bolt to be stripped, a rusted-in-place seat post and stem, and all sorts of other horrors. But really it came apart with no problems, just a little penetrating oil and patience.


That's as far as I made it in the first week, but parts were on the way.
August 18: Polishing, modernizing & test-fitting

You really can get good results from a rattle-can paint job, but it takes a lot of patience and work. I'm willing to work, but not always patient enough. Nevertheless, I was pretty happy overall with the paint after wet-sanding and polishing, especially considering the number of nicks and divots in the nearly 80-year-old steel. I may still give it a bit more love, but it's really looking pretty good to my eyes.
The original headbadge also cleaned up nicely. I wish some prior owner hadn't "touched up" the paint, but I'm not going to try to correct it -- it can wear it's history. I just wanted to polish the grime off and bring back some shine.

I put in a nice bottom bracket conversion kit so I can use modern three-piece cranks. I also had a strong and light Sunlite bottom bracket with chrome-moly spindle in the toolkit, so that will save a few grams, too. I considered external bearings and a hollowtech crank, but I'm not sure how well they'd play with the conversion kit, and good quality square taper stuff isn't much heavier at all. Plus I have a lot of good square taper stuff laying around already.

This bike pulled another rabbit out of its hat up front, where I've fitted a threadless headset. Basically, these old American frames used a head tube that's within a gnat's whisker of the modern 1 1/8 standard, so some enterprising souls have taken machined about 0.01 inched off a modern alumninum headset and voila it all fits.
I had a fork I had purchased for the build, but when I put it altogether it looked goofy. So for now I've put a parts-bin GT fork on there, and I actually kinda like it, even in the partially sanded unfinished current state.

Since I was throwing some parts-bin bits at it, I added a stem and some bars. Not exactly what I'd envisioned, but I like them for now and the price was right.
Sept 22: Wheels!
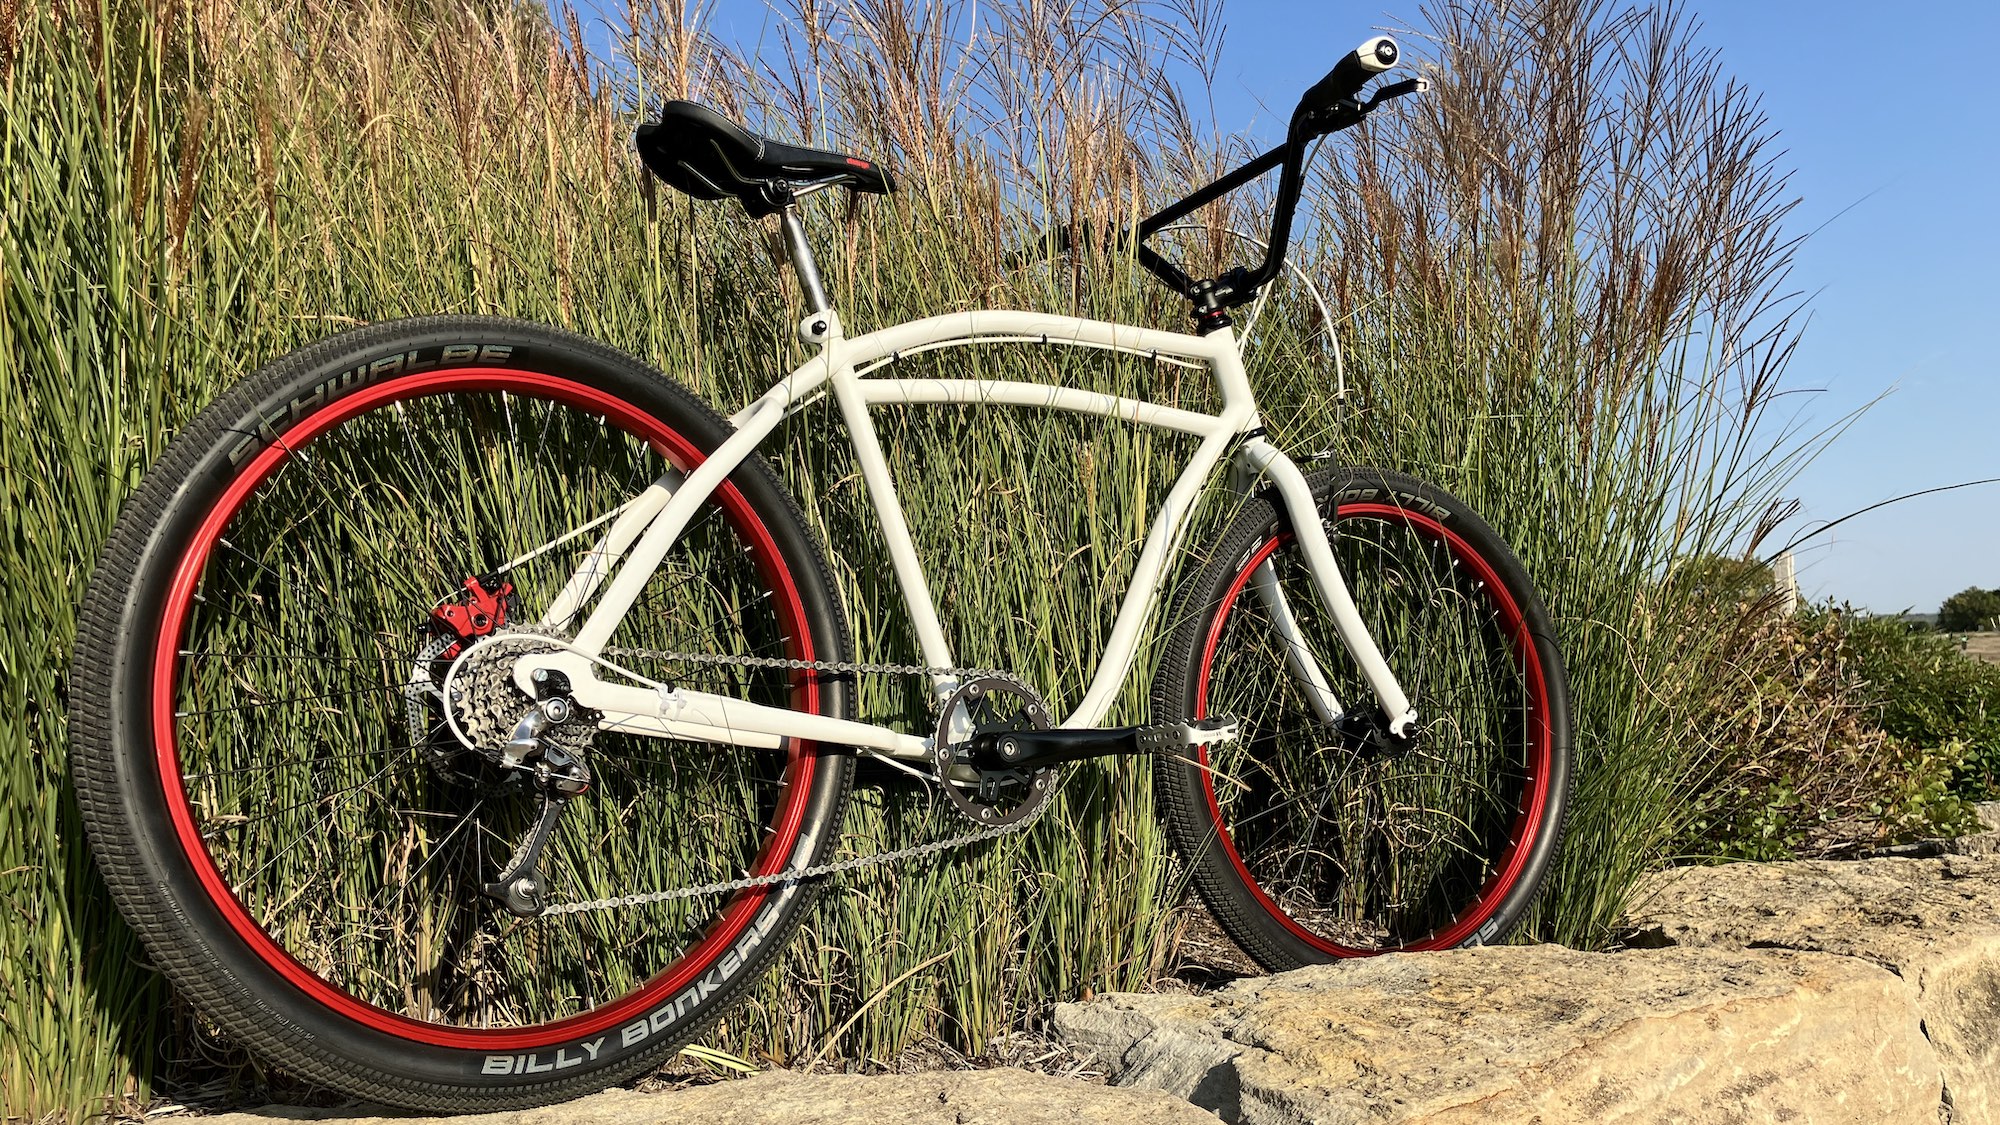
I knew when I decided to paint the frame white that I was going to have to introduce some visual interest elsewhere, so I decided to make some pretty flashy wheels, starting with some red anodized SE Racing Wheels.

Because BMX and cruiser rims are nearly universally 36 holes, I was a little limited in my choices for 36H disc hubs, but Shimano came through with suitable Deore hubs for a great price. The whole thing was laced up with double-butted black spokes and chrome brass nipples. They are definitely eye-catching.


Once they were finally tensioned and trued, I slapped some Schwalbe Billy Bonkers tires on -- probably my favorite 26" tires -- and they were ready for the bike.
Connecting a derailleur to this thing was going to require an old school claw hanger, and it's surprisingly tough to get a decent one nowadays. A lot of them are very thin and flimsy, or even unthreaded. Next time I take apart an old bike with one, I plan to keep it, as the old ones were clearly made better. But it'll do.

I dug around in the parts bins and found a little dropout spacer for the other side that I'd saved from some prior project. I wish I knew where I got it, 'cause it's pretty handy.

I was really surprised by how easy the disc brake conversion went. Disc brakes are surprisingly cheap, and the little disc brake converstion/adapter bracket worked way, way better than I expected it to, at least in this case. They don't work in a lot of cases, but on this bike they worked without much trouble. I was shocked. Everything just worked.

Cables were managed by some little clip on guides that were pretty slick.
The seat was a bit of a hiccup, as the original post measured 21.78 mm, and nothing is that size. Nothing. So after looking fruitlessly I decided not to worry about it and just cleaned up the original as best as I could. I did have a nice Charge saddle that completed the white/black/red motif.
Most of the other stuff was left over from other projects. Pedals, cables, even the crankset, it was all just laying around, so I went ahead and built it up, at least to establish a baseline.


The baseline is good. It's a fun, fun, fun bike. That said, there are some issues I need to address:
- I still want those big klunker bars, with a bit more rise.
- I need to either pick up a disc brake fork or fit some V-brakes on the front (and risk messing up that pretty red rim).
- It needs a spacer under the stem. Right now there's too much movement.
- The disc brake isn't adjusted quite right and tends to squeal.
- I don't like the derailleur I used and need to clean up a better one.
- My cabling could be a lot tidier.
None of this stuff is particularly surprising with such an involved build, and none of it is all that hard to sort out.
October 16: Sorting it out
I continued tweaking and tuning and sorting it out. With a big custom build like this one, it's not surprising.
At this point, I've taken care of most all of my to-do list above and the bike is riding much better. Probably the most visible change is the switch to some massive BMX cruiser bars. This entailed re-cabling, swapping out the shifters and brake levers, and a lot of other small changes. I'm not sure it was worth it, but they do look cool.


Honestly, I may revert back to the low-rise bars. I haven't decided. I'm feeling pros and cons each way.
But regardless, I think that's about it for this bike, at least for now. Maybe after riding it a bit I'll think of something else I want to do. For now, though, I think I can call this one finished.
That's good, because I've already bought the next one.
As an Amazon Associate I earn from qualifying purchases. In other words, I get commissions for purchases made through links in this post. When you follow a link and buy something, it doesn't cost you anything extra, but I may make buck or two. So thank you! That said, any recommendations I make are my recommendations, based on my experience, and are not paid endorsements. I only point you toward the stuff I use, and if I don't like it, you'll hear about why.
Have something you'd like to say about this? Let me know! | Published in Bikes