The bedraggled Raleigh
A bound-for-the-dumpster Raleigh Sports gets a new lease on life.
I've had an urge to take experience a classic British three-speed for awhile now. The laid-back geometry, relaxed, upright ride and smooth internally-geared hubs just speak to me.
In the time of COVID, even ragged projects seem to be fetching an awful lot of money, and since I already had too many projects going anyway, I figured that would have to just remain a daydream for awhile.

And then this Raleigh turned up, literally asking to be picked up from the curb. Who could resist a free Raleigh Sports? So, after taking just enough time to be sure it was mostly all there, I drug it home.
And I quickly discovered there were reasons it was free. It was really in pretty rough shape. I expected the tires to be flat, and for it to be grimy. Honestly for free, I didn't expect much, but figured even if it was a total bust I could just tuck the Sturmey-Archer three-speed hub away for some future project.
Even so, I really didn't know what I was getting myself into.
As an Amazon Associate I earn from qualifying purchases. In other words, I get commissions for purchases made through links in this post. When you follow a link and buy something, it doesn't cost you anything extra, but I may make buck or two. So thank you! That said, any recommendations I make are my recommendations, based on my experience, and are not paid endorsements. I only point you toward the stuff I use, and if I don't like it, you'll hear about why.


Once it was in the shop getting disassembled, I got to learn a few quirks of old Raleighs:
- They're ridiculously overbuilt. Even though the '70s versions (like this one) cut a lot more corners than the legendarily well-made '50s versions, it was still clearly a bicycle that was built to last. Which means even parts that seem way too far gone to save tend to clean up well, most times.
- None of your wrenches will fit. Raleigh used their own standards and if either a metric or standard wrench fits, it's down to luck and coincidence, so you best have a collection of good adjustable wrenches. I like this Channel-Lock, which doubles as a cone nut wrench.
- There are a ridiculous number of ball bearings in old Raleighs, and they're all loose. Be sure you're ready to catch them all when you open up the headset, bottom bracket, or basically anything else.
Reassembly

The Raleigh had clearly been left outside, unloved, for a long time. There was a thick layer of grime and tree sap that had sun-baked deep into the paint. Cleaning it was a multistep process:
- Household multi-purpose cleaner and a blue non-scratch scrubbing pad to get the surface grime off.
- Turtle Wax Heavy Duty Rubbing Compound to try to cut the paint back to the original Lemon Yellow as much as possible. This was only somewhat successful.
- Turtle Wax polishing compound to bring some shine back to the paint.
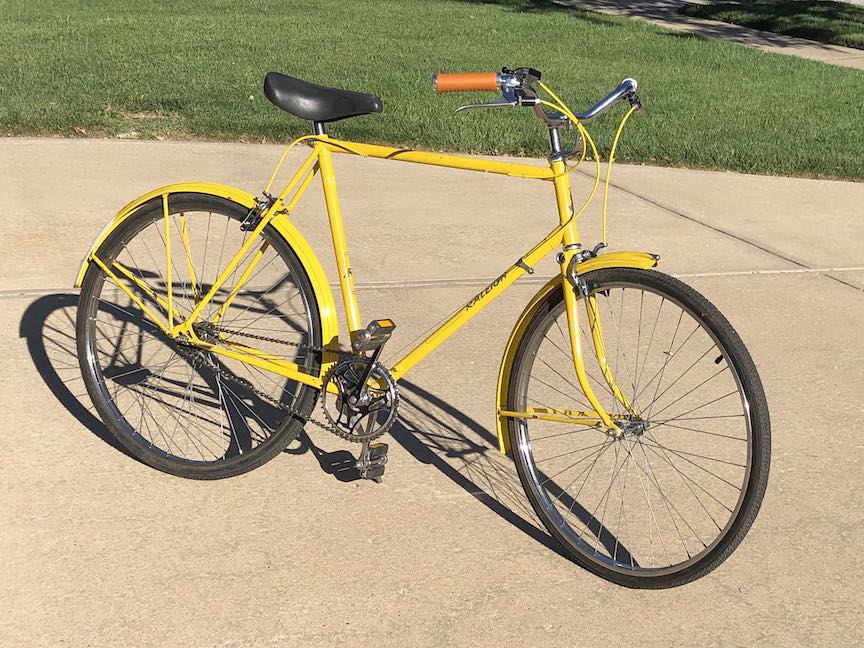
In the end, the paint is still pretty chipped and scraped, but it's yellow again, and shiny, and the patina does have appeal.
The fenders went through the same process, although they had an extra step of bending and hammering the metal back into some semblance of shape. I am not a metalworker by any means, but anyone with a little care can do some basic things to make the metal at least a bit more presentable. One of these days I'll get myself a proper set of metalworking hammers and dollies.
For the chrome parts, I sprayed a penetrating oil and scrubbed with fine steel wool. That's always worked well for me. Once the grime and surface rust was gone, Mother's metal polish brought back the shine.


The rear wheel - spoke replacement, tensioning and trueing.
The rear wheel was a special challenge, since it was missing a spoke. After measuring carefully I ordered heavy-duty spokes and a spoke wrench. Neither is anything fancy, but they were more than adequate for the task at hand.
I knew most of the spokes were under-tensioned, but had to do some research on how to easily check the tension. I was pretty happy when I learned you can "tune" spokes to notes on the scale. With that knowledge in hand, I grabbed a Snark tuner and an Irwin Quick Grip,and went to town. The Snark was clipped it to the seatstay to easily see the note the spoke was ringing out, while the Quick Grip accurately held the newly polished brake calipers in position.

I can't claim the end results are pro-level, but I can't complain, either. The rim stays off the calipers and is pretty darn close to straight. Not bad for a first timer. It doesn't hurt that those heavy steel Raleigh wheels are pretty forgiving.
Final steps
With the wheel straightened out, the rest of the rebuild was largely replacing the wear-item parts on it, including a new KMC single-speed chain, some faux-leather grips, new yellow brake and shifter cables and inexpensive brake pads.
I also had to buy new cotter pins to replace the ones I destroyed in the removal process.
And with that, it was done.

Truth be told, the frame is way too big for me and I'll probably end up selling it, letting it go to a new home and fund the next project. But for now, I'm enjoying it as it is. I call it "Lemon".
August 2020: Goodbye, Raleigh

I really enjoyed rebuilding the Raleigh Sports and learning so much more of the lore of these fascinating bikes and their indestructible three-speed hubs (thank you Sheldon Brown!) I really liked riding it around, too. The upright position, the smoothness of the internal gearing, the character of it, all that appealed. I found it thoroughly charming and enjoyed almost every minute of the restoration (except those cotter pins), especially since this particular example was so close to the brink before I brought it back.
But really, it's quite a bit too big for me, and I can't keep them all. So on the market it went. And as it turned out it went to a very nice young lady who's already an avid rider, but wanted something fun and funky for around town. The lemon yellow Raleigh seems to fill the bill perfectly, so I think it went to a good home. I hope it's good to her for a long time. Raleigh sure built them to last.
Have something you'd like to say about this? Let me know! | Published in Bikes